Configuring Connections
A connection is initiated
whenever a message is sent to or received from a remote server. You can
configure both incoming and outgoing connections on your SMTP virtual
server.
Configuring Incoming Connections
You configure
incoming connections on an SMTP virtual server in the virtual server’s
Properties dialog box. On the General tab, you can specify the options
listed in Table 1.
Table 1. Incoming Connection Options
| Option | Description |
|---|
| Limit Number Of Connections To | Specifies
the number of concurrent connections for incoming message delivery. If
the check box is not selected, no limit is imposed. When the check box
is selected, the minimum is one connection. |
| Connection Time-Out (Minutes) | Specifies the time allowed before an inactive connection is closed. The default is 10 minutes. |
Configuring Outgoing Connections
You also use the
Properties dialog box to configure the outgoing connections used by
your virtual server to deliver messages. In this case, the settings are
in Outbound Connections on the Delivery tab. These settings can help you
monitor system resources by limiting inactive connections and
connections to remote domains. They are listed in Table 2.
Table 2. Outgoing Connection Options
| Option | Description |
|---|
| Limit Connections To | Specifies
the total number of simultaneous outbound connections to all remote
domains that can exist at one time. The default is 1,000 connections.
The minimum is one connection. This setting can be used to improve
system performance in conjunction with the Limit Number Of Messages Per
Connection To option on the Messages tab. If you do not select the check
box, no limit is imposed. |
| Time-Out (Minutes) | Specifies the time allowed before an inactive connection closes. The default is 10 minutes. |
| Limit Connections Per Domain To | Limits
connections to any single remote domain. The default is 100
connections. This number should be less than or equal to the value for
the Limit Connections To option. If you do not select the check box, no
limit is imposed. |
| TCP Port | Allocates
the TCP port on SMTP remote servers to which the SMTP virtual server
connects. The default is port 25. The outgoing port setting can be the
same as the port setting for incoming transmissions. |
Securing SMTP Traffic
You can secure SMTP traffic by using authentication, encryption, and reverse DNS lookup. Authentication
ensures that the user is who he or she claims to be. More powerful
authentication methods such as Kerberos ensure that the e-mail server is
authenticated in addition to the user. Encryption ensures that only the recipient for whom a message is intended can read it. Reverse DNS lookup is used to prevent spoofing, where an attacker impersonates a trusted host by using its IP address in an attempt to gain unauthorized access.
Authentication
Exchange
supports three authentication methods: anonymous authentication, basic
authentication, and Integrated Windows Authentication. The method that
you choose for SMTP depends on your environment.
Anonymous Authentication
This is
the most common method used for Internet communication and provides
limited access to specific public folders and directory information.
Anonymous authentication is supported by all clients and is used to
allow users to access unsecured content in public folders. To enable
users to connect anonymously, you create a user account in IIS.
Basic Authentication
Exchange
performs simple challenge and response authentication by requiring users
to enter their user name, domain name, and password to gain access to
mailbox data. Most client computers support basic authentication. This
method provides the simplest level of security.
Important
Basic
authentication sends a user’s name and password as clear text. It is
therefore insecure. Basic authentication should not be used unless there
is no alternative or unless the entire TCP/IP session is encrypted. |
Integrated Windows Authentication
This method
offers security, efficient communication, and transparency. You can use
Integrated Windows Authentication when you have Windows-based clients
that do not use TLS. This method uses Kerberos for clients running
Windows 2000 or later and NTLM for Windows clients that are not running
Active Directory. When you use Integrated Windows Authentication, the
password is sent as an encrypted value.
Encryption
Encryption scrambles (or hashes)
the contents of an e-mail message into a code that can be read only by
the person who has the key to decode it on his or her computer.
Authentication does not encrypt message data. Therefore, to make your
data truly secure, you should use TLS to encrypt e-mail messages
transferred between the client and the server. Because TLS encrypts the
entire TCP/IP session between the client and the server, the session is
secure even if you chose a logon authentication method, such as basic
authentication, that does not encrypt the user name and password. To use
TLS, the server must have an X.509 SSL certificate issued by a trusted
CA. For more information about TLS, refer to RFC 2487.
Reverse DNS Lookup
IP spoofing is an
attack on a network in which an attacker impersonates a trusted host by
using its IP address in an attempt to gain unauthorized access to a
computer network. Enabling reverse DNS lookup helps to prevent IP
spoofing. Reverse DNS lookup resolves an IP address to a hostname or
FQDN. In this application, DNS uses reverse lookup to confirm that the
IP address of the sending host is from the network that is specified by
the sender’s registered SMTP domain name. The result of the reverse
lookup is written into the SMTP header of the message, indicating
whether the lookup matched.
Caution
Reverse DNS lookup can degrade message transfer performance and prevent the relaying of messages through multiple hops. |
Restricting Internet E-Mail
Your organization could
have a large number of employees but allow only a few of them to send
and receive Internet e-mail. Some companies, for example, restrict
Internet e-mail access to full-time employees only, or a school might
allow staff to receive and send Internet e-mail, but not students.
You can configure
the SMTP connector so that only specific users or groups can send e-mail
outside of the company and control how messages are sent from a
specific recipient to specific connectors. You can use the options on
the Delivery Restrictions tab of a connector’s properties to accept or
reject e-mail messages from any sender listed in the directory. If, for
example, you add the address of a sender to the Reject Messages From
list, any messages from that sender that access the connecter are
returned.
By
default, a connector accepts all messages from all senders. Delivery
restrictions are optional and you must configure them if you want them
to be used. You restrict user accounts from sending Internet e-mail by
navigating to Connectors in Exchange System Manager, right-clicking the
connector that you want to restrict, clicking Properties, and then
specifying the name of the sender or senders in the Accept Messages From
or Reject Messages From pane on the Delivery Restrictions tab. Detailed
steps for restricting user accounts from sending Internet e-mail are
included in a practice later in this lesson.
Preventing or Restricting Junk E-Mail Propagation
If your Exchange organization is connected to the Internet and uses open relaying—that is, you do not restrict or prevent relaying—then your Exchange servers are vulnerable to an attack called mail relaying.
This is a practice in which unauthorized users send e-mail messages
from the e-mail server of an organization that is not their own. This
enables them to use the resources of the organization or to make it
appear that the messages originated from that organization. This
practice is often used to send unsolicited commercial e-mail, commonly
referred to as junk mail or spam. When an unauthorized user uses your
Exchange server to send out junk e-mail, the following events happen:
The unauthorized
user sends a single e-mail message to your SMTP server and addresses
multiple recipients in the message. These recipients have e-mail
addresses that are in domains external to your Exchange organization.
Because SMTP servers use anonymous authentication by default, your server accepts the inbound message.
After
the message is accepted, your SMTP server recognizes that the message
recipients belong to external domains, so it delivers the messages.
The unauthorized user
needs to send only one junk e-mail message to your SMTP server, which
could then deliver the message to thousands of recipients. This
distribution slows down your Exchange server, congests your queues, and
upsets people who receive the junk e-mail message. It may also cause
other legitimate servers to block e-mail from your Exchange server.
By default, relaying
is not permitted on virtual SMTP servers. There are times, however,
when relaying is required. For example, you may have Post Office
Protocol 3 (POP3) and Internet Message Access Protocol 4 (IMAP4) clients
who rely on SMTP for message delivery and who have legitimate reasons
for sending e-mail messages to external domains. In this case, you
should not allow, or should seriously restrict, open relaying on any
Exchange server connected to the Internet. You should then create an
additional SMTP virtual server that is dedicated to receiving e-mail
messages from POP3 and IMAP4 clients. This additional SMTP virtual
server can use authentication combined with SSL-based encryption and can
be configured to allow relaying for authenticated clients.
You prevent
unauthorized users from propagating junk e-mail through your Exchange
organization by preventing or restricting open relaying. You can prevent
open relaying by not granting relay permissions to any other hosts. You
can restrict relaying to a limited number of users or groups by using a
Discretionary Access Control List (DACL) to specify the groups of users
who can relay e-mail messages through an SMTP virtual server. The
latter technique is useful if you have a group of users who should be
allowed to relay e-mail messages to the Internet, but you want to
prevent anyone else from doing so. You can also grant relay permission
to an IP address, domain, and subnet in Exchange.
Retrieving E-Mail from an ISP Over a Dial-Up Connection
If your organization
connects to the Internet via a dial-up connection to an ISP, and if you
configure Exchange to receive Internet e-mail messages using SMTP, then
any e-mail message that is sent while your connection is not active can
be lost. In this situation, you should connect your Exchange servers to
the Internet by using the Routing and Remote Access service. You need to
configure the on-demand dial-up connection in Routing and Remote
Access, and then configure a smart host for the Exchange SMTP virtual
server or SMTP connector.
A pull relationship
is a relationship in which one computer queues messages and the other
computer pulls them by using the turn or etrn commands. You can use an
SMTP connector when you require a pull relationship between servers and
configure this connector to retrieve e-mail in a queue from a remote
SMTP server at specified intervals. This means that a remote
domain—typically at an ISP—can receive and hold e-mail on behalf of a
destination domain. Messages sent to the remote domain are held until
the SMTP etrn or turn command is received from an authorized account on
your Exchange server.
You can configure Exchange
to use etrn commands to pull e-mail for a specific routing group by
browsing to the Connectors container for that routing group in Exchange
System Manager, right-clicking the SMTP connector, and then clicking
Properties. In the Properties dialog box, click Advanced, and then click
Request ETRN/TURN When Sending Messages. If you need to, specify the
times at which you want the SMTP connector to contact the remote domain
and trigger the delivery of queued e-mail, and then select the
Additionally Request Mail At Specified Times check box.
The
detailed procedures for creating a demand-dial interface and
configuring an SMTP connector to pull e-mail from an ISP are described
in a practice later in this lesson.
Identifying Message Delivery Failures
When a message is delivered
from one host to another, a failure may occur at several points. The
first step in troubleshooting the problem is to identify where the
failure occurred. You can use the telnet and nslookup utilities to
tackle the problem.
telnet
In the previous lesson, you learned how telnet can be used to test an
ESMTP connection. If an SMTP host is unable to deliver messages, you can
use telnet to check whether a TCP port can be opened to a receiving
host and whether the receiving host is responding. You can use the
telnet fully_qualified_domain_name 25 command to specify the TCP port
(port 25 for SMTP) to open to a destination host and either the ehlo or
helo commands to test the SMTP connection.
nslookup
You can use the nslookup command to query DNS to confirm that DNS is
working properly and that MX and A (host) records exist for a particular
SMTP domain. You can, for example, use the nslookup –querytype=mx
tailspintoys.com command to return all the DNS MX records for the domain
tailspintoys.com.
Practice: Configuring SMTP Security and Demand-Dial Communications
In this
practice, you configure authentication and encryption, restrict selected
user accounts from sending Internet e-mail, and configure relaying. You
have the option to prevent open relaying in Exchange, restrict open
relaying permission to selected users, or override relay settings on an
SMTP virtual server. Finally, you configure your SMTP virtual server to
pull mail that is queued on another server.
Exercise 1: Configure Authentication for Incoming Messages
In this exercise, you configure authentication on the additional virtual server that you created in in this article.
The same procedure can be used to configure authentication on the
default virtual server. You can perform this task while logged on at
either Server01 or Server02 as a domain or exchange administrator.
To configure authentication for incoming messages, perform the following steps:
1. | Open Exchange System Manager.
|
2. | Navigate to Administrative Groups\First Administrative Group\Servers\Server01\Protocols\SMTP.
|
3. | Right-click
SMTP_server1, and then click Properties.
|
4. | On the Access tab, under Access Control, click Authentication.
|
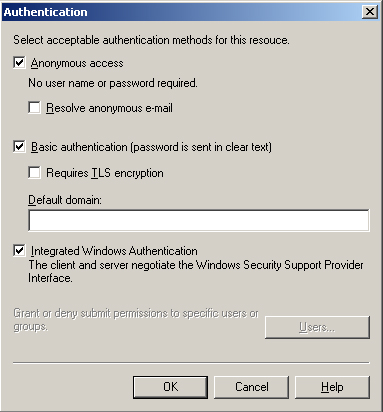
5. | You
can now select the authentication method or methods. If you select
Basic Authentication, then you can specify a Windows domain name or
accept the default. This default domain differs from the SMTP virtual
server default domain. Do not select the Requires TLS Encryption check
box unless you have obtained the necessary certificate and configured
encryption as described in the next exercise. Figure 10-6 shows the Authentication page.
|
6. | Click OK. Click OK again to close the SMTP_server1 Properties box.
|
Exercise 2: Configure TLS Encryption
To
require TLS encryption on a virtual service, you need to obtain the
appropriate certificates and specify TLS Encryption. You then have the
option to configure the encryption strength.
To enable, specify, and configure TLS encryption, perform the following steps:
1. | Access Exchange System Manager.
|
2. | Navigate to Administrative Groups\First Administrative Group\Servers\Server01\Protocols\SMTP.
|
3. | Right-click SMTP_server1, and then click Properties.
|
4. | To
set up new key certificates and manage installed key certificates for
the SMTP virtual server, click Certificate on the Access tab, under
Secure Communication.
|
5. | Complete the Web Server Certificate Wizard.
Note You
can complete the wizard and obtain the certificate immediately only if
Server01 is configured as an enterprise root CA. Otherwise, you save the
request to a file that you need to submit to a CA to obtain the
certificate. |
|
6. | On the Access tab of the SMTP_server1 Properties box, click Authentication.
|
7. | Select the Requires TLS Encryption box. You can select the box only if you have specified Basic Authentication.
|
8. | Click OK.
|
9. | Under Secure Communication, click Communication.
|
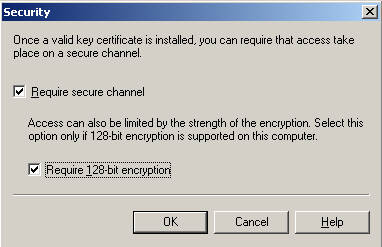
10. | In Security, select the Require Secure Channel check box.
|
11. | Select the Require 128-bit Encryption check box if you require this level of encryption. Figure 2 shows the Security page.
|
12. | Click OK.
|
13. | Click OK again to close the SMTP_server1 Properties box.
|
Exercise 3: Restrict User Accounts from Sending Internet E-Mail
In this exercise, you
will specify the users who are prohibited from sending Internet e-mail.
You can specify groups in addition to, or instead of, individual users.
1. | Open
Exchange System Manager and browse to Administrative Groups\First
Administrative Group\Routing Groups\First Routing Group\Connectors.
|
2. | In the details pane, right-click General SMTP Connector, and then click Properties.
|
3. | Click Delivery Restrictions on the General tab on the SMTP Connector Properties dialog box.
|
4. | On the Delivery Restrictions tab, in the Reject Messages From pane, click Add.
|
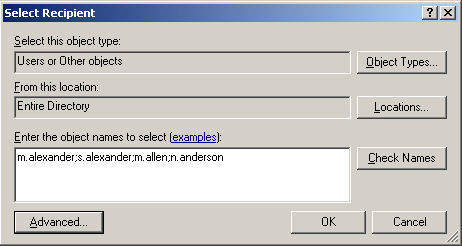
5. | In
the Select Recipient box, type the usernames of the prohibited users.
Use a semicolon to separate the usernames—for example, m.alexander;
s.alexander; m.allen; n.anderson. Click OK.
|
6. | Click OK in the SMTP Connector Properties dialog box.
|
Figure 3 shows the usernames being added.
Exercise 4: Prevent Open Relaying
Open relaying is
disabled by default. However, a situation could exist where it has
previously been enabled, and you now need to disable it.
1. | Access Exchange System Manager.
|
2. | Navigate to Administrative Groups\First Administrative Group\Servers\Server01\Protocols\SMTP.
|
3. | Right-click SMTP_server1, and then click Properties.
|
4. | Click Relay on the Access tab. This displays the Access Control options.
|
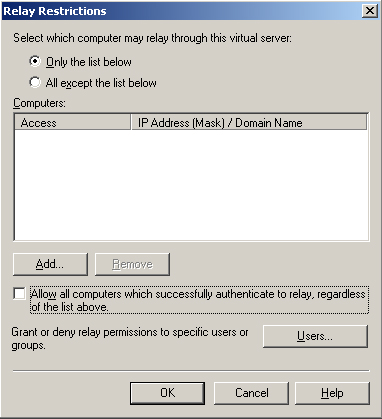
5. | On
the Relay Restrictions dialog box, ensure that the selection for those
computers that may relay e-mail messages is set to Only The List Below,
and that the list is blank.
|
6. | Clear
the Allow All Computers Which Successfully Authenticate To Relay,
Regardless Of The List Above check box. This box should always be
cleared unless you are using POP3 and IMAP4 clients with this virtual
server. Figure 4 shows the Relay Restrictions dialog box.
|
7. | Click OK.
|
8. | Click OK again to close the SMTP_server1 Properties dialog box.
|
Caution
If
you configure All Except The List Below, and anonymous access is
allowed as an authentication method, any computer on the Internet that
is not on the list can relay e-mail messages through the virtual server.
This condition is called anonymous relay
and can result in unauthorized users relaying junk e-mail or other
unwanted messages through your server. In addition, operating an
anonymous relay may be in violation of your ISP’s terms of service. |
Exercise 5: Configure the SMTP Connector to Override Relay Settings on the SMTP Virtual Server
In this
exercise, you configure Exchange to allow SMTP relaying for both
authenticated and unauthenticated users. You do this by configuring the
SMTP connector to override relay settings on the SMTP virtual server.
1. | Open
Exchange System Manager, browse to Administrative Groups\First
Administrative Group\Routing Groups\First Routing Group\Connectors, and
then expand Connectors.
|
2. | In the console tree, right-click General SMTP Connector and click Properties.
|
3. | On
the Address Space tab, select the Allow Messages To Be Relayed To These
Domains check box, and then click OK. Click OK when warned that this
overrides the default restrictions for relaying on the SMTP virtual
server.
|
Exercise 6: Connect to the Internet by Using Routing and Remote Access
In this exercise,
you configure a demand-dial connection on Server02. For security
reasons, you would normally use a front-end server to access the
Internet. You cannot complete this exercise unless you have a modem
installed on Server02. If you do not have a modem installed, then you
can complete Exercise 7 as a practice, but you will not be able to pull
mail across a demand-dial connection.
1. | Open
the Routing and Remote Access console on Server02, expand Server02, and
right-click Ports. A modem installed on Server02 should be displayed as
a port.
|
2. | Right-click the port, and then click Properties.
|
3. | On
the Port Properties dialog box, click Configure, select the Demand-Dial
Routing Connections (Inbound And Outbound) check box, and then click
OK.
|
4. | To create a demand-dial interface and configure it to use the modem to dial up to the ISP, you need to perform two actions:
- Right-click
the server, make sure that the router flag is on and that LAN and
Demand Dial Routing is selected, and then click OK.
- Right-click Routing Interfaces, and then click New Demand Dial Interface.
|
5. | Add a default network route that uses the newly created demand-dial interface.
|
Exercise 7: Configure Exchange Server 2003 to Pull Queued E-Mail from Another Server by Using the Etrn Command
In this exercise, you will configure Server02 to pull e-mail messages from another server.
1. | Open
Exchange System Manager, browse to Administrative Groups\First
Administrative Group\Routing Groups\First Routing Group\Connectors, and
then expand Connectors.
|
2. | In the console tree, right-click General SMTP Connector and click Properties.
|
3. | On the Advanced tab, click Request ETRN/TURN From Different Server. In the Server box, type ISPSERVER, and then click OK.
|
4. | Restart Server02. |